"People spot a big black lens and they worry about what they're doing, or how their hair looks. Nobody sees the person holding the camera" - Erica O'Rourke.
Our first venture with a DSLR proved to be quite challenging, learning the basics of how to use a camera, and which settings were needed to succeed. Firstly, we needed to know the basics of 'the exposure triangle'.
The exposure triangle is a fairly simple theory that incorporates the three most important settings needed to correctly expose our shots. Firstly: 'aperture' - this is a hole or an opening on the lens through which light travels. The lens on the camera allows us to set aperture, where the smaller the number of the aperture stop, the wider the aperture is. This allowed us to control how much light was being allowed into the lens, and assisted us in correctly exposing our shot.
The next incorporation into the exposure triangle is 'ISO' This is the indication of how sensitive the film is to light, its measured in numbers (usually these consist of 100, 200, 400, 800 etc). The lower the number, the lower the sensitivity of the film, and the finer the grain in the shots being taken.
The final part of the exposure triangle is 'shutter speed' This affects how much motion blur is in each frame of the video. At 25 frames per second, a normal shutter speed would be 1/50th. The faster the shutter speed, the sharper the image.
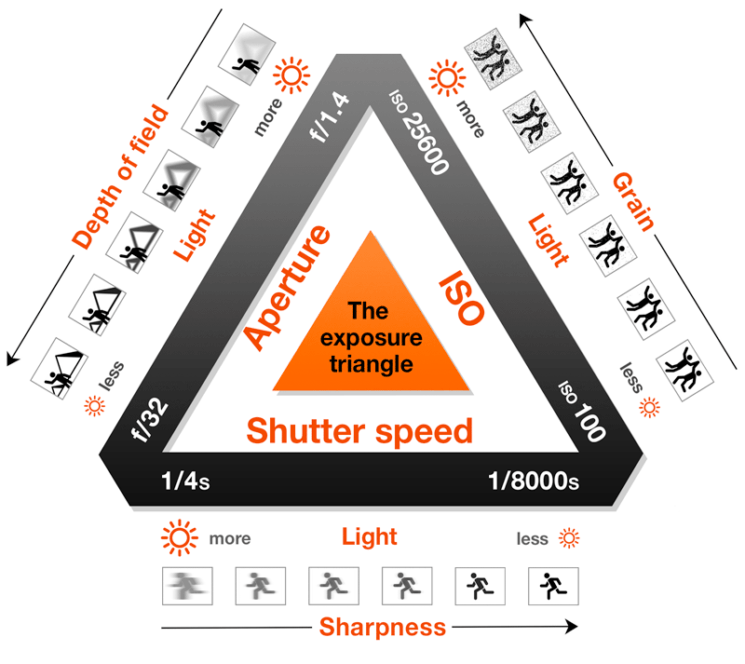 |
| The exposure triangle |
The opening shot in our short piece (which can be seen at the end of the post) is focused on a padlock in the foreground, whilst a figure fiddles with a locker in the background. The foreground is in complete focus, however the background is blurred out. To do this, we needed to create a 'shallow depth of field' This was created by widening the aperture of the lens. The lower our f-stop number was, the shallower the depth of field created. For this process, we used an aperture of f/3.5.
After capturing our footage, our next step was to import our footage from our DSLR's to the Mac computer. By inserting the SD card and creating a new folder on the mac called 'footage', the pieces we captured were now available in this folder. Because the SD cards we used were owned by the college, we needed to format the card afterwards.
To edit our footage, we used 'Adobe Premier Pro'. This program allowed us to create 'bins' in which we could store things like our footage, audio and titles. Being completely new to editing and this program, the exploration of Adobe and the DSLR has been extremely helpful to me.
Our piece opens with a fade-in. To create this, we needed to use the pen tool in post-production. Once our footage had been placed on the track in Premier Pro, the pen tool allowed us to create key frames on the opacity line of the footage. By creating a key frame at the beginning of the footage, then again a bit further along, then dragging the first key-frame to the bottom of the track, we successfully create a 'fade-in'
 |
| Fade-in example |
This footage below however is not complete, due to absences in our group, we were not able to add titles, or more clips/transitions. So for next time, to improve, we'd need to add more shots and transitions, including credits and a title.
A well-written and clear summary. Well done Sean.
ReplyDelete